Mojang’s latest update, Minecraft 1.21.6 – Chase the Skies, has landed with exciting new features such as the Tears music disc, craftable saddles, harnesses, and even happy Ghasts! But let’s be honest—no Minecraft update feels complete without a proper shader setup to make your world come alive with stunning visuals.
Also Check: How to Install Shaders in Minecraft Java Edition: A Complete Visual Upgrade Guide
If you’ve updated to version 1.21.6 and want to take your Minecraft graphics to the next level, here’s your go-to guide for installing and using shaders—featuring Iris Shaders and Sodium for the ultimate experience.
Also Check: Minecraft Enchantment Guide: How to Craft, Set Up & Use Enchanting Tables Effectively
What Are Shaders in Minecraft?
Shaders are visual enhancements that drastically improve Minecraft’s graphics—adding realistic lighting, shadows, water reflections, and more. With the 1.21.6 update, many popular shader packs are already compatible, thanks to the quick work of the modding community.
How to Install Shaders in Minecraft 1.21.6
Step 1: Download Iris Shaders with Sodium

To get started, head over to the official Iris Shaders website. Click on the “Download Now” button to grab the installer. This installer is all you need—it will install both Iris (shader support) and Sodium (performance optimization).
These mods are the perfect combo: Iris enables shader packs, and Sodium boosts game performance.
Step 2: Run the Iris Installer

Once downloaded, run the installer. It should automatically detect your Minecraft directory and pre-select the 1.21.6 version. Make sure to choose the “Iris + Fabric” installation option if you plan on adding more mods later.
Just want shaders and performance boost? Then the default “Iris” install is fine—it will include Sodium by default.
Step 3: Download Shader Packs

Now that Iris is installed, it’s time to grab your favorite shaders. Visit sites like:
Look for shader packs compatible with Minecraft 1.21.6. Some popular choices include Complementary Shaders, BSL, and SEUS. These come in .zip format—no need to unzip them.
Step 4: Install Shader Packs in Minecraft

-
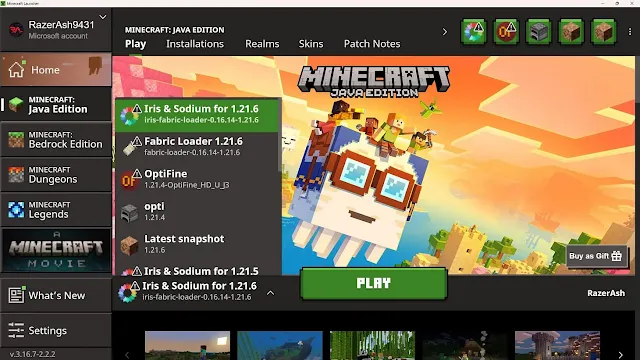
Open the Minecraft Launcher.
-
Select “Iris & Sodium for 1.21.6” from the dropdown menu and hit Play.
-
Once the game loads, go to Options → Video Settings.
-
Navigate to Shader Packs → Open Shader Pack Folder.
-
Drag and drop your
.zipshader file into this folder. -
Go back to Minecraft and select the shader pack to activate it.
You’re now ready to dive into your beautifully enhanced Minecraft world!
Why Use Shaders with Minecraft 1.21.6?
The Chase the Skies update includes vibrant new elements like Vibrant Visuals for Bedrock and cool content like dried Ghasts. Shaders make all of this look 10x better, offering immersive lighting, realistic textures, and breathtaking skies—perfect for this update’s theme.
The Minecraft 1.21.6 "Chase the Skies" update is packed with exciting content—but adding shaders takes your gameplay experience to a whole new level. Whether you're exploring new mobs or crafting dried Ghasts, enhanced visuals will make everything feel more immersive.
Install Iris, download your favorite shader pack, and enjoy Minecraft like never before!


0 Comments